Marionettes.cz
- Puppets
- Puppets For Kids and Fans
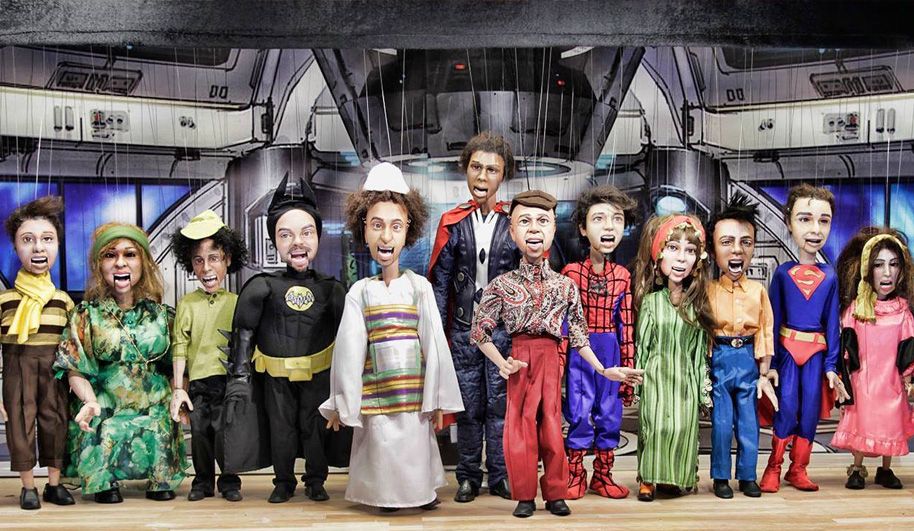
![Puppets For Kids and Fans]() Our Puppets For Kids and Fans page offers a fantastic selection of handmade marionettes, suitable for both beginners and seasoned puppeteers. We’ve categorized these puppets to make browsing easy, helping you find the perfect one for your needs. Whether you're looking for classic characters, animals, or something unique, these marionettes are crafted with care in the Czech Republic, blending tradition and quality. Explore the variety and discover a puppet that will capture your heart!
Our Puppets For Kids and Fans page offers a fantastic selection of handmade marionettes, suitable for both beginners and seasoned puppeteers. We’ve categorized these puppets to make browsing easy, helping you find the perfect one for your needs. Whether you're looking for classic characters, animals, or something unique, these marionettes are crafted with care in the Czech Republic, blending tradition and quality. Explore the variety and discover a puppet that will capture your heart! - Art Puppets
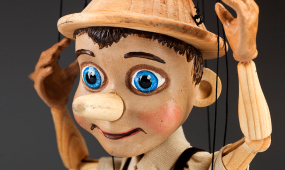
![Art Puppets]() Art Marionettes are our best selection of puppets that are both unique and special in every possible way. Each creation is an original detailed piece of art. Art Marionettes will make a wonderful addition to your collection and they will bring joy and beauty into your home. Lifetime figurines that age like wine...For better clarity we've sorted them into a few categories bellow. So look at and enjoy :)
Katerina Novakova
Art Marionettes are our best selection of puppets that are both unique and special in every possible way. Each creation is an original detailed piece of art. Art Marionettes will make a wonderful addition to your collection and they will bring joy and beauty into your home. Lifetime figurines that age like wine...For better clarity we've sorted them into a few categories bellow. So look at and enjoy :)
Katerina Novakova - Performance Puppets
![Performance Puppets]() They are fully functional professionally articulated and balanced puppets. You'll meet them on the street, at a party, or in a video somewhere on social media. You can choose from our existing range, or you can come up with your own idea and we will make a professional puppet for you.
They are fully functional professionally articulated and balanced puppets. You'll meet them on the street, at a party, or in a video somewhere on social media. You can choose from our existing range, or you can come up with your own idea and we will make a professional puppet for you. - Publications
![Publications]() A wide range of magazines and publications are dedicated to the art of puppetry. These publications cover various aspects of puppetry, from its history in the Czech Republic to contemporary practices. They include both print and digital formats, offering detailed insights into the craftsmanship, tradition, and storytelling that puppetry embodies. This collection is perfect for enthusiasts, collectors, or anyone interested in exploring the world of marionettes.
A wide range of magazines and publications are dedicated to the art of puppetry. These publications cover various aspects of puppetry, from its history in the Czech Republic to contemporary practices. They include both print and digital formats, offering detailed insights into the craftsmanship, tradition, and storytelling that puppetry embodies. This collection is perfect for enthusiasts, collectors, or anyone interested in exploring the world of marionettes.
- Puppets For Kids and Fans
- DIY & Parts
- Do it yourself - KITs
![Do it yourself - KITs]() Make your own marionettes. You're skilled to and we know it! Assemble a puppet from a pre-prepared set. Parts for making puppets. Made in Czech Republic. Safe materials. Wooden toys. Quality Czech product.
Make your own marionettes. You're skilled to and we know it! Assemble a puppet from a pre-prepared set. Parts for making puppets. Made in Czech Republic. Safe materials. Wooden toys. Quality Czech product. - Material for puppet construction
![Material for puppet construction]() We’re excited to offer a wide range of top-quality materials and accessories for crafting your own marionettes! Whether you're a seasoned professional or just starting out as a hobbyist, we have everything you need to bring your puppets to life. Our selection includes premium wood, strong and durable strings, and finely detailed hardware, ensuring that your marionettes are both functional and beautifully handcrafted. We take pride in providing products that help you express your creativity while making sure your creations are built to last. Whatever your project, we’re here to support you every step of the way!
We’re excited to offer a wide range of top-quality materials and accessories for crafting your own marionettes! Whether you're a seasoned professional or just starting out as a hobbyist, we have everything you need to bring your puppets to life. Our selection includes premium wood, strong and durable strings, and finely detailed hardware, ensuring that your marionettes are both functional and beautifully handcrafted. We take pride in providing products that help you express your creativity while making sure your creations are built to last. Whatever your project, we’re here to support you every step of the way! - Marionette Stands
![Marionette Stands]() Marionette stands are vital in the marionette world, supporting beautifully crafted puppets for display. Typically made of wood, the stands are designed to hold the marionette upright and prevent string tangling. They also showcase the puppets as decorative art pieces, reflecting the artistry and tradition of Czech puppet-making. Whether in a theater or a collector's home, marionette stands to preserve and enhance the charm of these iconic cultural treasures.
Marionette stands are vital in the marionette world, supporting beautifully crafted puppets for display. Typically made of wood, the stands are designed to hold the marionette upright and prevent string tangling. They also showcase the puppets as decorative art pieces, reflecting the artistry and tradition of Czech puppet-making. Whether in a theater or a collector's home, marionette stands to preserve and enhance the charm of these iconic cultural treasures. - Control devices for marionettes
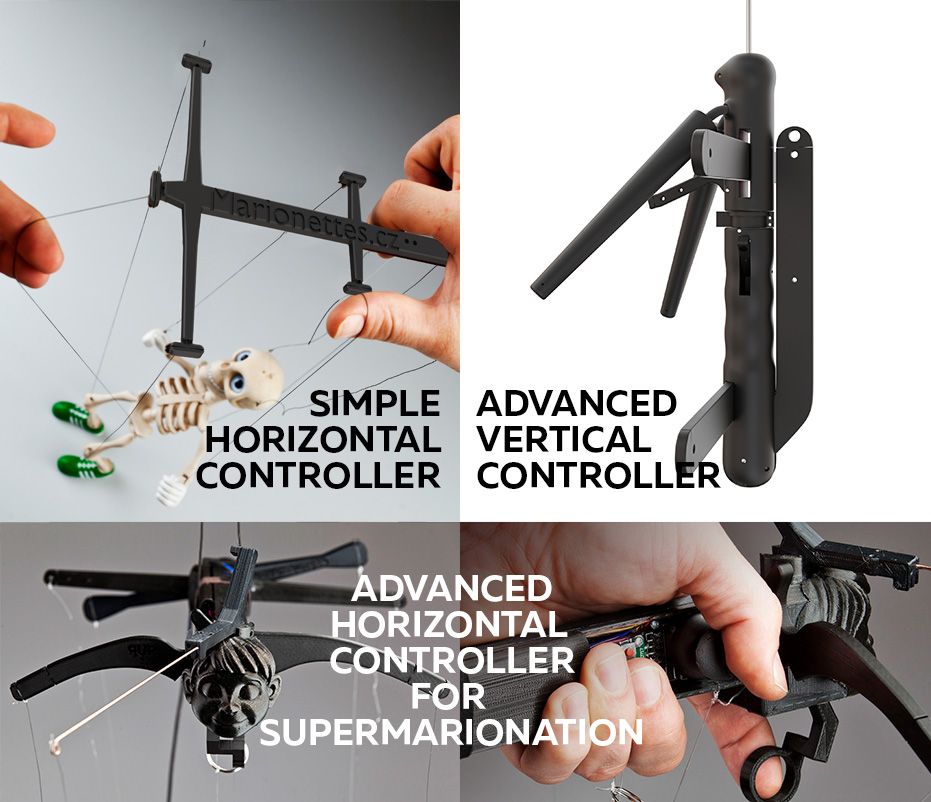
![Control devices for marionettes]() Our marionette controllers are designed to offer precise and effortless manipulation for both beginners and professionals. Crafted from high-quality wood and metal, they provide excellent balance and control, making it easy to bring your puppets to life. Whether you're aiming for subtle gestures or complex movements, our selection ranges from simple crossbar designs to more advanced systems, ensuring the perfect fit for any skill level. With our controllers, you'll enjoy smooth, natural movements that enhance the artistry of puppeteering.
Our marionette controllers are designed to offer precise and effortless manipulation for both beginners and professionals. Crafted from high-quality wood and metal, they provide excellent balance and control, making it easy to bring your puppets to life. Whether you're aiming for subtle gestures or complex movements, our selection ranges from simple crossbar designs to more advanced systems, ensuring the perfect fit for any skill level. With our controllers, you'll enjoy smooth, natural movements that enhance the artistry of puppeteering. - Marionette bodies, heads, shoes
![Marionette bodies, heads, shoes]() On our Bodies and Heads, Marionette Parts & Shoes page, we offer a variety of high-quality components to help you create or customize your marionettes. Our selection includes intricately crafted heads, fully formed bodies and detailed shoes, all available in different sizes and styles to match your puppet's character. Whether you're assembling a new marionette or giving an existing one a fresh look, these parts ensure both durability and artistic detail, making your creations stand out.
On our Bodies and Heads, Marionette Parts & Shoes page, we offer a variety of high-quality components to help you create or customize your marionettes. Our selection includes intricately crafted heads, fully formed bodies and detailed shoes, all available in different sizes and styles to match your puppet's character. Whether you're assembling a new marionette or giving an existing one a fresh look, these parts ensure both durability and artistic detail, making your creations stand out. - Filaments for 3D printing
![Filaments for 3D printing]() Filaments for 3D printers
Just as an inkjet printer needs a cartridge to print, 3D printers need printing filaments, also known as filaments. These most often differ in the material they are made of. Read on to find out what 3D filaments exist and how to choose between them.
Types of filaments
3D filaments are made from many materials, each with different properties that directly affect what the filament is suitable for. Let's take a look together at the most common types of filament.
PLA filament
PLA filament is made up of polylactic acid and is a popular choice for both beginner and advanced 3D printers. It is an eco-friendly and safe 3D filament used to make medical implants or consumer products such as food packaging or disposable tableware. It can be purchased in both glow-in-the-dark and traditional versions.
PETG filament
PETG filament is a modified and improved variation of PET filament. Due to its flexibility and impact resistance, it is used to produce protective phone covers or mechanical parts. Most PETG filaments are also safe for contact with food
Filaments for 3D printers
Just as an inkjet printer needs a cartridge to print, 3D printers need printing filaments, also known as filaments. These most often differ in the material they are made of. Read on to find out what 3D filaments exist and how to choose between them.
Types of filaments
3D filaments are made from many materials, each with different properties that directly affect what the filament is suitable for. Let's take a look together at the most common types of filament.
PLA filament
PLA filament is made up of polylactic acid and is a popular choice for both beginner and advanced 3D printers. It is an eco-friendly and safe 3D filament used to make medical implants or consumer products such as food packaging or disposable tableware. It can be purchased in both glow-in-the-dark and traditional versions.
PETG filament
PETG filament is a modified and improved variation of PET filament. Due to its flexibility and impact resistance, it is used to produce protective phone covers or mechanical parts. Most PETG filaments are also safe for contact with food
- Do it yourself - KITs
- Custom Puppets
- Marionettes made based on a photo
![Marionettes made based on a photo]() Would you like to have your own puppet or a portrait marionette of your loved ones?
No problem! We will be happy to make you a puppet made based on the photo ... In our portfolio, you will find small doubles of famous personalities and puppet enthusiasts. According to specific requirements, we use different technologies and production methods. Some puppets are the work of carvers, others are produced by using 3D technology. It's up to you what will be your choice.
Click on Show details and read more about how we make marionettes based on a photo:
Would you like to have your own puppet or a portrait marionette of your loved ones?
No problem! We will be happy to make you a puppet made based on the photo ... In our portfolio, you will find small doubles of famous personalities and puppet enthusiasts. According to specific requirements, we use different technologies and production methods. Some puppets are the work of carvers, others are produced by using 3D technology. It's up to you what will be your choice.
Click on Show details and read more about how we make marionettes based on a photo: - Professional puppets for theatres, film & ads
![Professional puppets for theatres, film & ads]() We are flexible and are able to complete your project quickly. We have global experience in both creating and operating puppets.
The process of production is:
1. designing an idea (sketches, drawings)2. technical drawings (designed movements to your needs)3. 3Dmodeling for visual approval4. production of physical parts and assembling5. painting and costume-making6. balancing movements7. shipping and logistics
Time and pricing
Standard production time is 6 weeks. We are able to reduce this leadtime to 10 days in extreme cases. Cutting down time increases the price. The average price for a professional custom puppet is 1500 USD.
We are flexible and are able to complete your project quickly. We have global experience in both creating and operating puppets.
The process of production is:
1. designing an idea (sketches, drawings)2. technical drawings (designed movements to your needs)3. 3Dmodeling for visual approval4. production of physical parts and assembling5. painting and costume-making6. balancing movements7. shipping and logistics
Time and pricing
Standard production time is 6 weeks. We are able to reduce this leadtime to 10 days in extreme cases. Cutting down time increases the price. The average price for a professional custom puppet is 1500 USD. - Replicas
![Replicas]() There are many puppet icons that have been addressed by millions of people in their time. In our studio, we can make their almost-perfect replicas. It is a challenge for us to achieve the perfect quality, authenticity and add some of our deep knowledge. At the same time, we collect facts about these puppets, so if you have any kind of helpful information, be sure to share it with us!
There are many puppet icons that have been addressed by millions of people in their time. In our studio, we can make their almost-perfect replicas. It is a challenge for us to achieve the perfect quality, authenticity and add some of our deep knowledge. At the same time, we collect facts about these puppets, so if you have any kind of helpful information, be sure to share it with us! - Bespoke Puppets
![Bespoke Puppets]() We are proud to say that our country is the only one in the world where you can study puppetry both at high school and continue your education in this unique art form at the university level. This deep tradition of puppetry education has shaped generations of skilled artists, ensuring that the craft is passed down with the highest level of expertise. Some of our team members have gone even further, studying disciplines such as sculpture, painting, and other fine arts at the prestigious Academy of Fine Arts in Prague. This additional training in visual arts enriches the creativity and craftsmanship that go into each of our marionettes.
Our team is a collective of passionate artists and artisans, all dedicated to creating high-quality, handcrafted puppets that not only tell stories but also bring joy and inspiration to those who interact with them. With our diverse background in the arts and extensive experience in puppetry, we are excited to collaborate with you to bring your ideas to life. Whether you’re looking for a traditional character or something entirely original, we will use our knowledge, skills, and attention to detail to make your artistic dreams a reality. For us, it’s not just about making a puppet—it’s about creating a piece of art that captures imagination and evokes emotion.
We are proud to say that our country is the only one in the world where you can study puppetry both at high school and continue your education in this unique art form at the university level. This deep tradition of puppetry education has shaped generations of skilled artists, ensuring that the craft is passed down with the highest level of expertise. Some of our team members have gone even further, studying disciplines such as sculpture, painting, and other fine arts at the prestigious Academy of Fine Arts in Prague. This additional training in visual arts enriches the creativity and craftsmanship that go into each of our marionettes.
Our team is a collective of passionate artists and artisans, all dedicated to creating high-quality, handcrafted puppets that not only tell stories but also bring joy and inspiration to those who interact with them. With our diverse background in the arts and extensive experience in puppetry, we are excited to collaborate with you to bring your ideas to life. Whether you’re looking for a traditional character or something entirely original, we will use our knowledge, skills, and attention to detail to make your artistic dreams a reality. For us, it’s not just about making a puppet—it’s about creating a piece of art that captures imagination and evokes emotion.
- Marionettes made based on a photo
- Puppets for 3D printing
- Complete puppets for 3D printing
![Complete puppets for 3D printing]() Here we have our database of animal puppets ready to print on 3D printers. We can also customize the files to your needs. The license for each file allows you to print up to 5 pieces.
Please note that the price of your order includes only the electronic 3D model file (*.stl). The printing of your puppet is up to you :)
How to make a marionette? | Marionettes.cz
Enjoy!
Here we have our database of animal puppets ready to print on 3D printers. We can also customize the files to your needs. The license for each file allows you to print up to 5 pieces.
Please note that the price of your order includes only the electronic 3D model file (*.stl). The printing of your puppet is up to you :)
How to make a marionette? | Marionettes.cz
Enjoy! - Bodies for 3D printing
![Bodies for 3D printing]() In this category, you’ll find a variety of 3D models of marionette bodies, ready to form the foundation of your puppet. From simple base structures to more detailed designs, these files provide the essential framework on which you can build character, personality, and movement. Whether you’re creating a traditional marionette or experimenting with a modern twist, our models give you a solid starting point.
All files are provided in *.stl format and carefully prepared for straightforward 3D printing and assembly. Your order includes the digital file only—printing, finishing, and bringing your marionette to life is in your hands. Enjoy shaping your own unique puppets, starting from the body up!
How to make a marionette? | Marionettes.cz
In this category, you’ll find a variety of 3D models of marionette bodies, ready to form the foundation of your puppet. From simple base structures to more detailed designs, these files provide the essential framework on which you can build character, personality, and movement. Whether you’re creating a traditional marionette or experimenting with a modern twist, our models give you a solid starting point.
All files are provided in *.stl format and carefully prepared for straightforward 3D printing and assembly. Your order includes the digital file only—printing, finishing, and bringing your marionette to life is in your hands. Enjoy shaping your own unique puppets, starting from the body up!
How to make a marionette? | Marionettes.cz - Heads for 3D printing
![Heads for 3D printing]() Here we have our database of marionette heads ready for printing at 3D printers. We can also customise the files to suit your needs. Please note your the price of your order includes an electronic file with 3D model (*.stl) only. The printing of your marionette is down to you :)Enjoy!
How to make a marionette? | Marionettes.cz
Here we have our database of marionette heads ready for printing at 3D printers. We can also customise the files to suit your needs. Please note your the price of your order includes an electronic file with 3D model (*.stl) only. The printing of your marionette is down to you :)Enjoy!
How to make a marionette? | Marionettes.cz - Shoes for 3D printing
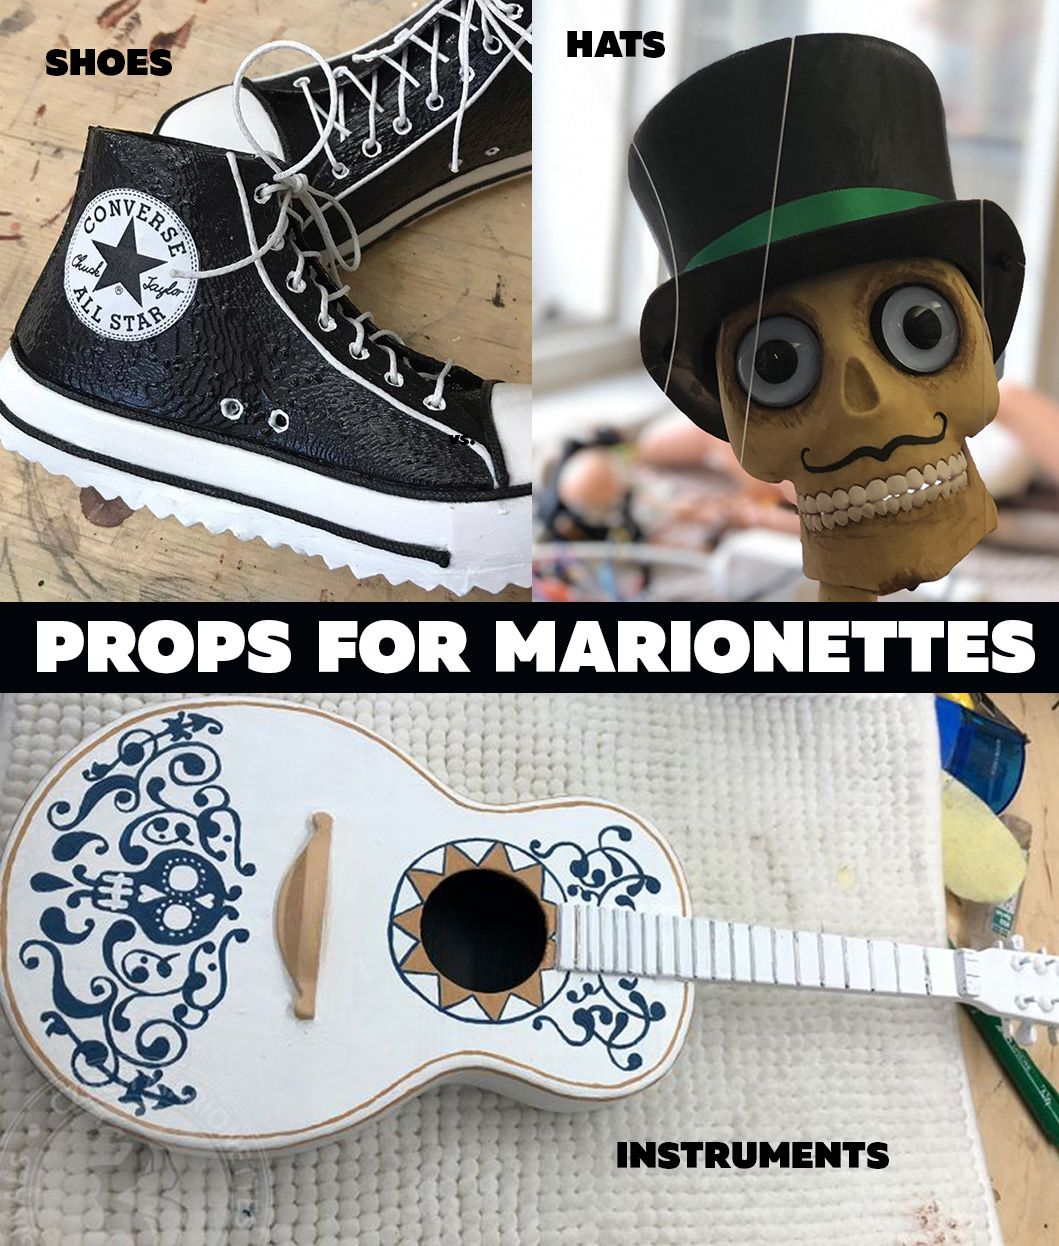
![Shoes for 3D printing]() Here you can explore our collection of 3D models for marionette footwear and accessories, ready to bring extra detail and character to your creations. From casual Converse to elegant polished shoes or sporty basketball sneakers, you’ll find styles to suit a wide range of puppet personalities.
Each file comes in *.stl format, prepared for smooth 3D printing and easy integration with your puppet designs. The models are carefully designed to balance aesthetics with practicality, making them both stylish and functional. If you need something special, we can also create customized designs to fit your vision. Please note that your purchase provides the digital file only—the printing and assembly of your marionette’s shoes and accessories is up to you.
How to make a marionette? | Marionettes.cz
Here you can explore our collection of 3D models for marionette footwear and accessories, ready to bring extra detail and character to your creations. From casual Converse to elegant polished shoes or sporty basketball sneakers, you’ll find styles to suit a wide range of puppet personalities.
Each file comes in *.stl format, prepared for smooth 3D printing and easy integration with your puppet designs. The models are carefully designed to balance aesthetics with practicality, making them both stylish and functional. If you need something special, we can also create customized designs to fit your vision. Please note that your purchase provides the digital file only—the printing and assembly of your marionette’s shoes and accessories is up to you.
How to make a marionette? | Marionettes.cz - Hands for 3D printing
![Hands for 3D printing]() Discover our collection of 3D-printable marionette hands, designed to give your puppets personality and expression. Hands are an essential detail in puppet-making, whether you’re aiming for a classic theatrical look, a playful character, or a more realistic design. Our database offers ready-to-print models that you can easily incorporate into your own marionette projects, making it simple to add that final touch of craftsmanship.
Discover our collection of 3D-printable marionette hands, designed to give your puppets personality and expression. Hands are an essential detail in puppet-making, whether you’re aiming for a classic theatrical look, a playful character, or a more realistic design. Our database offers ready-to-print models that you can easily incorporate into your own marionette projects, making it simple to add that final touch of craftsmanship. - Controllers and Eye mechanics
![Controllers and Eye mechanics]() In this category, you’ll find a collection of 3D-printable files dedicated to marionette controllers and eye mechanisms. These essential components bring your puppets to life—controllers give you precise movement and expression, while eye mechanisms add a captivating layer of realism and character. Whether you’re a puppeteer, hobbyist, or professional creator, our designs are ready to be downloaded and printed, making it easier than ever to build or customize your own marionette.
All files are provided in the standard *.stl format and optimized for 3D printing. Each design has been carefully prepared to balance functionality and ease of assembly, so you can focus on the creative part of your puppet-making. We also offer customization of the models to fit your specific needs. Please keep in mind that your purchase includes only the digital file—printing and assembling your marionette pieces is part of your own creative journey.
How to make a marionette? | Marionettes.cz
In this category, you’ll find a collection of 3D-printable files dedicated to marionette controllers and eye mechanisms. These essential components bring your puppets to life—controllers give you precise movement and expression, while eye mechanisms add a captivating layer of realism and character. Whether you’re a puppeteer, hobbyist, or professional creator, our designs are ready to be downloaded and printed, making it easier than ever to build or customize your own marionette.
All files are provided in the standard *.stl format and optimized for 3D printing. Each design has been carefully prepared to balance functionality and ease of assembly, so you can focus on the creative part of your puppet-making. We also offer customization of the models to fit your specific needs. Please keep in mind that your purchase includes only the digital file—printing and assembling your marionette pieces is part of your own creative journey.
How to make a marionette? | Marionettes.cz - Props for 3D printing
![Props for 3D printing]() In this category you will find a number of different props in 3D models. Now you can print props of guitar, piano, and other musical instruments on a 3D printer.
How to make a marionette? | Marionettes.cz
In this category you will find a number of different props in 3D models. Now you can print props of guitar, piano, and other musical instruments on a 3D printer.
How to make a marionette? | Marionettes.cz
- Complete puppets for 3D printing
- Courses
- Puppet Carving
![Puppet Carving]() Turn wood into a puppet according to your imagination. It is our imagination and energy that transform a piece of wood into a puppet. Wood has its own structure, which guides our chisel. If we are attentive and open to improvisation, even a random cut can inspire us on where to go next in seeking its shape and expression. Then, through it, we can tell stories...
Turn wood into a puppet according to your imagination. It is our imagination and energy that transform a piece of wood into a puppet. Wood has its own structure, which guides our chisel. If we are attentive and open to improvisation, even a random cut can inspire us on where to go next in seeking its shape and expression. Then, through it, we can tell stories... - Puppet Therapy
![Puppet Therapy]() We will let you understand how to use puppets as an effective therapy tool. See how we are developing a methodology to teach this phenomenon. Join the global project and see the courses we run.
We will let you understand how to use puppets as an effective therapy tool. See how we are developing a methodology to teach this phenomenon. Join the global project and see the courses we run. - Puppet Building
![Puppet Building]() Learn to assemble and decorate your own wooden puppet under the leadership of our experienced puppeteers and teachers. You can choose from courses that are simple or more advanced. Experience the joy of building your very own marionette.
Connect beauty and function. Reality and imagination. Matter and spirit. Puppet and puppeteer. The old puppeteers always said “A puppet must be made to be beautiful and to play itself”, and I would only add that this is a task full of many crafts.
Petr PuppeteerSenior Puppet Technologist – PUP
Learn to assemble and decorate your own wooden puppet under the leadership of our experienced puppeteers and teachers. You can choose from courses that are simple or more advanced. Experience the joy of building your very own marionette.
Connect beauty and function. Reality and imagination. Matter and spirit. Puppet and puppeteer. The old puppeteers always said “A puppet must be made to be beautiful and to play itself”, and I would only add that this is a task full of many crafts.
Petr PuppeteerSenior Puppet Technologist – PUP - Puppet Animation
![Puppet Animation]() Here you will find courses on rules and techniques to set you free in expressing your intention with the puppets. A puppet is like a shield to hide behind. It's giving you the freedom to say and act whatever you feel and want. We will teach you the technique.
Here you will find courses on rules and techniques to set you free in expressing your intention with the puppets. A puppet is like a shield to hide behind. It's giving you the freedom to say and act whatever you feel and want. We will teach you the technique.
- Puppet Carving
- Sale
 Our Puppets For Kids and Fans page offers a fantastic selection of handmade marionettes, suitable for both beginners and seasoned puppeteers. We’ve categorized these puppets to make browsing easy, helping you find the perfect one for your needs. Whether you're looking for classic characters, animals, or something unique, these marionettes are crafted with care in the Czech Republic, blending tradition and quality. Explore the variety and discover a puppet that will capture your heart!
 Art Marionettes are our best selection of puppets that are both unique and special in every possible way. Each creation is an original detailed piece of art. Art Marionettes will make a wonderful addition to your collection and they will bring joy and beauty into your home. Lifetime figurines that age like wine...For better clarity we've sorted them into a few categories bellow. So look at and enjoy :)
Katerina Novakova
Art Marionettes are our best selection of puppets that are both unique and special in every possible way. Each creation is an original detailed piece of art. Art Marionettes will make a wonderful addition to your collection and they will bring joy and beauty into your home. Lifetime figurines that age like wine...For better clarity we've sorted them into a few categories bellow. So look at and enjoy :)
Katerina Novakova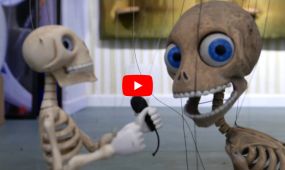 They are fully functional professionally articulated and balanced puppets. You'll meet them on the street, at a party, or in a video somewhere on social media. You can choose from our existing range, or you can come up with your own idea and we will make a professional puppet for you.
 A wide range of magazines and publications are dedicated to the art of puppetry. These publications cover various aspects of puppetry, from its history in the Czech Republic to contemporary practices. They include both print and digital formats, offering detailed insights into the craftsmanship, tradition, and storytelling that puppetry embodies. This collection is perfect for enthusiasts, collectors, or anyone interested in exploring the world of marionettes.
  Make your own marionettes. You're skilled to and we know it! Assemble a puppet from a pre-prepared set. Parts for making puppets. Made in Czech Republic. Safe materials. Wooden toys. Quality Czech product.
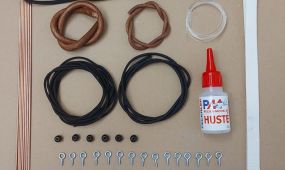 We’re excited to offer a wide range of top-quality materials and accessories for crafting your own marionettes! Whether you're a seasoned professional or just starting out as a hobbyist, we have everything you need to bring your puppets to life. Our selection includes premium wood, strong and durable strings, and finely detailed hardware, ensuring that your marionettes are both functional and beautifully handcrafted. We take pride in providing products that help you express your creativity while making sure your creations are built to last. Whatever your project, we’re here to support you every step of the way!
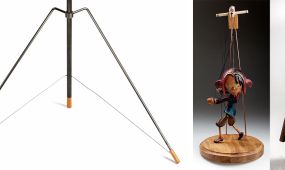 Marionette stands are vital in the marionette world, supporting beautifully crafted puppets for display. Typically made of wood, the stands are designed to hold the marionette upright and prevent string tangling. They also showcase the puppets as decorative art pieces, reflecting the artistry and tradition of Czech puppet-making. Whether in a theater or a collector's home, marionette stands to preserve and enhance the charm of these iconic cultural treasures.
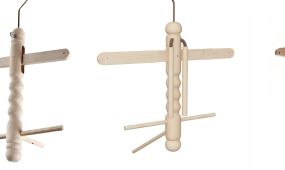 Our marionette controllers are designed to offer precise and effortless manipulation for both beginners and professionals. Crafted from high-quality wood and metal, they provide excellent balance and control, making it easy to bring your puppets to life. Whether you're aiming for subtle gestures or complex movements, our selection ranges from simple crossbar designs to more advanced systems, ensuring the perfect fit for any skill level. With our controllers, you'll enjoy smooth, natural movements that enhance the artistry of puppeteering.
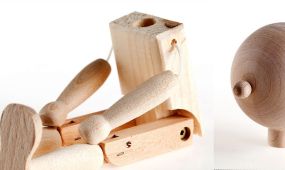 On our Bodies and Heads, Marionette Parts & Shoes page, we offer a variety of high-quality components to help you create or customize your marionettes. Our selection includes intricately crafted heads, fully formed bodies and detailed shoes, all available in different sizes and styles to match your puppet's character. Whether you're assembling a new marionette or giving an existing one a fresh look, these parts ensure both durability and artistic detail, making your creations stand out.
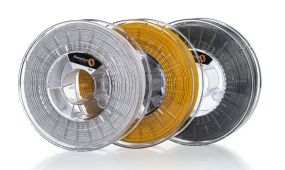 Filaments for 3D printers
Just as an inkjet printer needs a cartridge to print, 3D printers need printing filaments, also known as filaments. These most often differ in the material they are made of. Read on to find out what 3D filaments exist and how to choose between them.
Types of filaments
3D filaments are made from many materials, each with different properties that directly affect what the filament is suitable for. Let's take a look together at the most common types of filament.
PLA filament
PLA filament is made up of polylactic acid and is a popular choice for both beginner and advanced 3D printers. It is an eco-friendly and safe 3D filament used to make medical implants or consumer products such as food packaging or disposable tableware. It can be purchased in both glow-in-the-dark and traditional versions.
PETG filament
PETG filament is a modified and improved variation of PET filament. Due to its flexibility and impact resistance, it is used to produce protective phone covers or mechanical parts. Most PETG filaments are also safe for contact with food
Filaments for 3D printers
Just as an inkjet printer needs a cartridge to print, 3D printers need printing filaments, also known as filaments. These most often differ in the material they are made of. Read on to find out what 3D filaments exist and how to choose between them.
Types of filaments
3D filaments are made from many materials, each with different properties that directly affect what the filament is suitable for. Let's take a look together at the most common types of filament.
PLA filament
PLA filament is made up of polylactic acid and is a popular choice for both beginner and advanced 3D printers. It is an eco-friendly and safe 3D filament used to make medical implants or consumer products such as food packaging or disposable tableware. It can be purchased in both glow-in-the-dark and traditional versions.
PETG filament
PETG filament is a modified and improved variation of PET filament. Due to its flexibility and impact resistance, it is used to produce protective phone covers or mechanical parts. Most PETG filaments are also safe for contact with food
 Would you like to have your own puppet or a portrait marionette of your loved ones?
No problem! We will be happy to make you a puppet made based on the photo ... In our portfolio, you will find small doubles of famous personalities and puppet enthusiasts. According to specific requirements, we use different technologies and production methods. Some puppets are the work of carvers, others are produced by using 3D technology. It's up to you what will be your choice.
Click on Show details and read more about how we make marionettes based on a photo:
Would you like to have your own puppet or a portrait marionette of your loved ones?
No problem! We will be happy to make you a puppet made based on the photo ... In our portfolio, you will find small doubles of famous personalities and puppet enthusiasts. According to specific requirements, we use different technologies and production methods. Some puppets are the work of carvers, others are produced by using 3D technology. It's up to you what will be your choice.
Click on Show details and read more about how we make marionettes based on a photo: We are flexible and are able to complete your project quickly. We have global experience in both creating and operating puppets.
The process of production is:
1. designing an idea (sketches, drawings)2. technical drawings (designed movements to your needs)3. 3Dmodeling for visual approval4. production of physical parts and assembling5. painting and costume-making6. balancing movements7. shipping and logistics
Time and pricing
Standard production time is 6 weeks. We are able to reduce this leadtime to 10 days in extreme cases. Cutting down time increases the price. The average price for a professional custom puppet is 1500 USD.
We are flexible and are able to complete your project quickly. We have global experience in both creating and operating puppets.
The process of production is:
1. designing an idea (sketches, drawings)2. technical drawings (designed movements to your needs)3. 3Dmodeling for visual approval4. production of physical parts and assembling5. painting and costume-making6. balancing movements7. shipping and logistics
Time and pricing
Standard production time is 6 weeks. We are able to reduce this leadtime to 10 days in extreme cases. Cutting down time increases the price. The average price for a professional custom puppet is 1500 USD. There are many puppet icons that have been addressed by millions of people in their time. In our studio, we can make their almost-perfect replicas. It is a challenge for us to achieve the perfect quality, authenticity and add some of our deep knowledge. At the same time, we collect facts about these puppets, so if you have any kind of helpful information, be sure to share it with us!
 We are proud to say that our country is the only one in the world where you can study puppetry both at high school and continue your education in this unique art form at the university level. This deep tradition of puppetry education has shaped generations of skilled artists, ensuring that the craft is passed down with the highest level of expertise. Some of our team members have gone even further, studying disciplines such as sculpture, painting, and other fine arts at the prestigious Academy of Fine Arts in Prague. This additional training in visual arts enriches the creativity and craftsmanship that go into each of our marionettes.
Our team is a collective of passionate artists and artisans, all dedicated to creating high-quality, handcrafted puppets that not only tell stories but also bring joy and inspiration to those who interact with them. With our diverse background in the arts and extensive experience in puppetry, we are excited to collaborate with you to bring your ideas to life. Whether you’re looking for a traditional character or something entirely original, we will use our knowledge, skills, and attention to detail to make your artistic dreams a reality. For us, it’s not just about making a puppet—it’s about creating a piece of art that captures imagination and evokes emotion.
We are proud to say that our country is the only one in the world where you can study puppetry both at high school and continue your education in this unique art form at the university level. This deep tradition of puppetry education has shaped generations of skilled artists, ensuring that the craft is passed down with the highest level of expertise. Some of our team members have gone even further, studying disciplines such as sculpture, painting, and other fine arts at the prestigious Academy of Fine Arts in Prague. This additional training in visual arts enriches the creativity and craftsmanship that go into each of our marionettes.
Our team is a collective of passionate artists and artisans, all dedicated to creating high-quality, handcrafted puppets that not only tell stories but also bring joy and inspiration to those who interact with them. With our diverse background in the arts and extensive experience in puppetry, we are excited to collaborate with you to bring your ideas to life. Whether you’re looking for a traditional character or something entirely original, we will use our knowledge, skills, and attention to detail to make your artistic dreams a reality. For us, it’s not just about making a puppet—it’s about creating a piece of art that captures imagination and evokes emotion.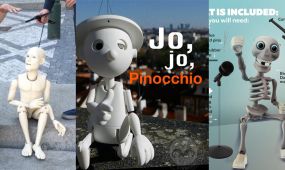 Here we have our database of animal puppets ready to print on 3D printers. We can also customize the files to your needs. The license for each file allows you to print up to 5 pieces.
Please note that the price of your order includes only the electronic 3D model file (*.stl). The printing of your puppet is up to you :)
How to make a marionette? | Marionettes.cz
Enjoy!
Here we have our database of animal puppets ready to print on 3D printers. We can also customize the files to your needs. The license for each file allows you to print up to 5 pieces.
Please note that the price of your order includes only the electronic 3D model file (*.stl). The printing of your puppet is up to you :)
How to make a marionette? | Marionettes.cz
Enjoy!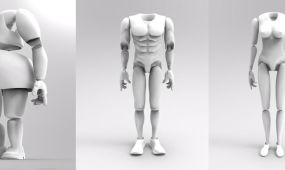 In this category, you’ll find a variety of 3D models of marionette bodies, ready to form the foundation of your puppet. From simple base structures to more detailed designs, these files provide the essential framework on which you can build character, personality, and movement. Whether you’re creating a traditional marionette or experimenting with a modern twist, our models give you a solid starting point.
All files are provided in *.stl format and carefully prepared for straightforward 3D printing and assembly. Your order includes the digital file only—printing, finishing, and bringing your marionette to life is in your hands. Enjoy shaping your own unique puppets, starting from the body up!
How to make a marionette? | Marionettes.cz
In this category, you’ll find a variety of 3D models of marionette bodies, ready to form the foundation of your puppet. From simple base structures to more detailed designs, these files provide the essential framework on which you can build character, personality, and movement. Whether you’re creating a traditional marionette or experimenting with a modern twist, our models give you a solid starting point.
All files are provided in *.stl format and carefully prepared for straightforward 3D printing and assembly. Your order includes the digital file only—printing, finishing, and bringing your marionette to life is in your hands. Enjoy shaping your own unique puppets, starting from the body up!
How to make a marionette? | Marionettes.cz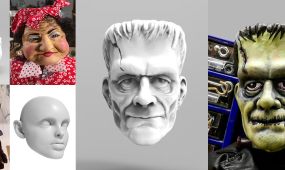 Here we have our database of marionette heads ready for printing at 3D printers. We can also customise the files to suit your needs. Please note your the price of your order includes an electronic file with 3D model (*.stl) only. The printing of your marionette is down to you :)Enjoy!
How to make a marionette? | Marionettes.cz
Here we have our database of marionette heads ready for printing at 3D printers. We can also customise the files to suit your needs. Please note your the price of your order includes an electronic file with 3D model (*.stl) only. The printing of your marionette is down to you :)Enjoy!
How to make a marionette? | Marionettes.cz Here you can explore our collection of 3D models for marionette footwear and accessories, ready to bring extra detail and character to your creations. From casual Converse to elegant polished shoes or sporty basketball sneakers, you’ll find styles to suit a wide range of puppet personalities.
Each file comes in *.stl format, prepared for smooth 3D printing and easy integration with your puppet designs. The models are carefully designed to balance aesthetics with practicality, making them both stylish and functional. If you need something special, we can also create customized designs to fit your vision. Please note that your purchase provides the digital file only—the printing and assembly of your marionette’s shoes and accessories is up to you.
How to make a marionette? | Marionettes.cz
Here you can explore our collection of 3D models for marionette footwear and accessories, ready to bring extra detail and character to your creations. From casual Converse to elegant polished shoes or sporty basketball sneakers, you’ll find styles to suit a wide range of puppet personalities.
Each file comes in *.stl format, prepared for smooth 3D printing and easy integration with your puppet designs. The models are carefully designed to balance aesthetics with practicality, making them both stylish and functional. If you need something special, we can also create customized designs to fit your vision. Please note that your purchase provides the digital file only—the printing and assembly of your marionette’s shoes and accessories is up to you.
How to make a marionette? | Marionettes.cz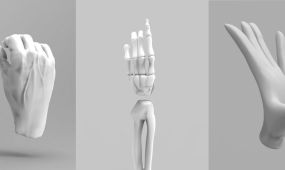 Discover our collection of 3D-printable marionette hands, designed to give your puppets personality and expression. Hands are an essential detail in puppet-making, whether you’re aiming for a classic theatrical look, a playful character, or a more realistic design. Our database offers ready-to-print models that you can easily incorporate into your own marionette projects, making it simple to add that final touch of craftsmanship.
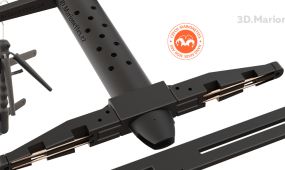 In this category, you’ll find a collection of 3D-printable files dedicated to marionette controllers and eye mechanisms. These essential components bring your puppets to life—controllers give you precise movement and expression, while eye mechanisms add a captivating layer of realism and character. Whether you’re a puppeteer, hobbyist, or professional creator, our designs are ready to be downloaded and printed, making it easier than ever to build or customize your own marionette.
All files are provided in the standard *.stl format and optimized for 3D printing. Each design has been carefully prepared to balance functionality and ease of assembly, so you can focus on the creative part of your puppet-making. We also offer customization of the models to fit your specific needs. Please keep in mind that your purchase includes only the digital file—printing and assembling your marionette pieces is part of your own creative journey.
How to make a marionette? | Marionettes.cz
In this category, you’ll find a collection of 3D-printable files dedicated to marionette controllers and eye mechanisms. These essential components bring your puppets to life—controllers give you precise movement and expression, while eye mechanisms add a captivating layer of realism and character. Whether you’re a puppeteer, hobbyist, or professional creator, our designs are ready to be downloaded and printed, making it easier than ever to build or customize your own marionette.
All files are provided in the standard *.stl format and optimized for 3D printing. Each design has been carefully prepared to balance functionality and ease of assembly, so you can focus on the creative part of your puppet-making. We also offer customization of the models to fit your specific needs. Please keep in mind that your purchase includes only the digital file—printing and assembling your marionette pieces is part of your own creative journey.
How to make a marionette? | Marionettes.cz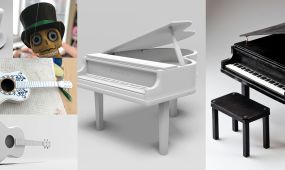 In this category you will find a number of different props in 3D models. Now you can print props of guitar, piano, and other musical instruments on a 3D printer.
How to make a marionette? | Marionettes.cz
In this category you will find a number of different props in 3D models. Now you can print props of guitar, piano, and other musical instruments on a 3D printer.
How to make a marionette? | Marionettes.cz Turn wood into a puppet according to your imagination. It is our imagination and energy that transform a piece of wood into a puppet. Wood has its own structure, which guides our chisel. If we are attentive and open to improvisation, even a random cut can inspire us on where to go next in seeking its shape and expression. Then, through it, we can tell stories...
 We will let you understand how to use puppets as an effective therapy tool. See how we are developing a methodology to teach this phenomenon. Join the global project and see the courses we run.
 Learn to assemble and decorate your own wooden puppet under the leadership of our experienced puppeteers and teachers. You can choose from courses that are simple or more advanced. Experience the joy of building your very own marionette.
Connect beauty and function. Reality and imagination. Matter and spirit. Puppet and puppeteer. The old puppeteers always said “A puppet must be made to be beautiful and to play itself”, and I would only add that this is a task full of many crafts.
Petr PuppeteerSenior Puppet Technologist – PUP
Learn to assemble and decorate your own wooden puppet under the leadership of our experienced puppeteers and teachers. You can choose from courses that are simple or more advanced. Experience the joy of building your very own marionette.
Connect beauty and function. Reality and imagination. Matter and spirit. Puppet and puppeteer. The old puppeteers always said “A puppet must be made to be beautiful and to play itself”, and I would only add that this is a task full of many crafts.
Petr PuppeteerSenior Puppet Technologist – PUP Here you will find courses on rules and techniques to set you free in expressing your intention with the puppets. A puppet is like a shield to hide behind. It's giving you the freedom to say and act whatever you feel and want. We will teach you the technique.